4,804 total views, 4 views today
Hello everyone, Welcome to blog.sunnydoshi.in, Laravel is one of the most known PHP frameworks in the market, used by millions of developers around the world. Laravel saves you time and effort because it ships with a lot of features out of the box. Moreover, installing Laravel is quite simple as well, and can be done within minutes.
This blog post covers Laravel 5 with Basic Authentication Tutorial. An important features of this Laravel 5.5 authentication Register New User, Login / Logout, Reset Password using Fake Local Email, Forgot Password, Authentication credentials validation email and/or password are incorrectly entered by the user(s).
Let’s Get Started
Table of Contents
- Server Requirements
- Installation Instructions
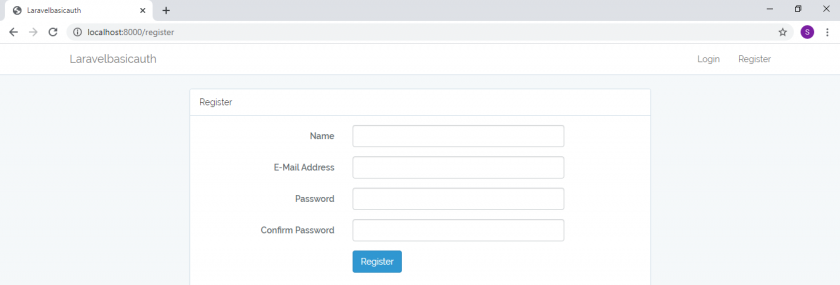
- Output Screenshot
- Feedback
- Official Documentation
- [Solved] – Errors occured when runtime
- Laravel Application Setup Local to Live on Github
- Laravel Useful Command, Bonus Tips
Server Requirements
You will need to make sure your server meets the following requirements:
- PHP >= 7.0.0
- OpenSSL PHP Extension
- Mbstring PHP Extension
- Tokenizer PHP Extension
- XML PHP Extension
- xampp OR wamp (Local system)
- Composer (Laravel utilizes Composer to manage its dependencies. So, before using Laravel, make sure you have Composer installed on your machine.)
- Git Bash (You can also use system command line as well)
- Nodejs (node_modules folder also contains the package dependencies related to your javascript projects. So, that you can require it in your projects. And All those packages and their dependencies are listed in package.json)
Installation Instructions
From local machine, Start the Apache and MySQL services from xampp or wamp whatever you use.

Create a new directory in (xampp\htdocs OR wamp\www) your system for your new Laravel project. Using command line for create new directory: mkdir <directoryname>
$ mkdir laravelbasicauthOpen Git bash, and Redirect to desired directory (project root folder) where you want to place your code, Type the following command there to install Laravel (Via Composer Create-Project):
Install laravel in your current directory:
$ composer create-project --prefer-dist laravel/laravel .
                                                     OR
Install laravel with new directory name: [Here (my-laravel-project) will be your new directory folder.]
$ composer create-project --prefer-dist laravel/laravel my-laravel-project
Start the Laravel service by executing the following command:
$ php artisan serve
# This will run Laravel default web server and you can access it using http://localhost:8000
It implies Laravel has been installed successfully.

Here, Laravel installed successfully. Now, we’ll go for Basic Auth demo. Check following steps for basic auth functions:
Create a MySQL database for the project, So for my case I will use “laravelbasicauth”
Copy .env.example to .env file and add your app settings and database settings in .env file, use following command:
$ cp .env.example .envTo change the application name and url, Goto project root directory->config->app.php
There is: ‘name’ => env(‘APP_NAME’, ‘Laravelbasicaith’)
As well you can change in .env file which is located in project root directory:
APP_NAME=Laravelbasicaith
APP_URL=http://localhost:8000
In a Laravel powered app, database configuration is handled by two files: .env and config/database.php. Update details for database configuration from .env file.
For local configuration:
DB_HOST=127.0.0.1
DB_DATABASE=laravelbasicauth
DB_USERNAME=root
DB_PASSWORD=
To setup mail configuration update in .env file:
MAIL_DRIVER=smtp
MAIL_HOST=smtp.mailtrap.io
MAIL_PORT=2525
MAIL_USERNAME=<setusername>
MAIL_PASSWORD=<setpassword>
MAIL_ENCRYPTION=null
MAIL_FROM_ADDRESS=<fromaddress>
MAIL_FROM_NAME=<fromname>
After updating .env file run following command for clear cache:
$ php artisan config:cache
$ php artisan config:clear
Next run the following command for Laravel uses the fresh applications and will install a layout view, registration and login views, as well as routes for all authentication endpoints:
$ php artisan make:auth
Next, To create table and migrate into database execute the migrate Artisan command:
$ php artisan migrate
To run the following command for project executing:
$ php artisan serve
This will run Laravel default web server and you can access it using http://localhost:8000.

If you want to run the project different port so use this command:
$ php artisan serve --port=8080

If you are not run php artisan server command, then direct go to your browser and type the URL (Here laravelbasicauth project name):
$ http://localhost/laravelbasicauth/public/
Done!
Output screenshot


Feedback
If you have any feedback to improve it, feel free to make a suggestion, or open a PR!
Official Documentation
Documentation for the framework can be found on the Laravel website.
[Solved] – Errors occured when runtime
For those running older versions of MySQL you may hit this error when trying to run migrations:

[Solution] Laravel 5.4 made a change to the default database character set, and it’s now utf8mb4 which includes support for storing emojis. This only affects new applications and as long as you are running MySQL v5.7.7 and higher you do not need to do anything.
- First drop all tables which migrated as previous command.
- To fix this all you have to do is edit your app/Providers/AppServiceProvider.php file and inside the boot method set a default string length:

use Illuminate\Support\Facades\Schema;
public function boot()
{
    Schema::defaultStringLength(191);
}

- After edit now execute command it will migrate the migrations files to the database successfully:
$ php artisan migrate
Laravel Application Setup Local to Live on Github
I have posted tutorial about – How to Adding an existing Local project to Live on GitHub using the Command Line: Check Here.
Laravel Usefull Command, Bonus Tips
I have posted tutorial about – Laravel Useful Command, Bonus Tips: Check Here.
Wrapping Up
Well done! You have just built your first app with Laravel. Laravel is an awesome framework to work with. It focuses on simplicity, clarity and getting work done. As we saw in this tutorial, you can easily activate the built-in authentication to your Laravel applications.
Please, let me know if you have any questions or observations in the comment section. 😊
Also, don’t hesitate to subscribe to newsletter if you like this article.


